Long-term timelapse photography is a mesmerizing art form that allows us to document the gradual transformations of landscapes, cityscapes, and life’s subtle changes. Whether you’re capturing the seasons’ shift, the construction of a magnificent building, or a suspended bridge, long-term timelapse videos offer a unique perspective on the world. In this guide, we’ll embark on a journey to explore the art and science of shooting long-term time-lapses, from meticulous planning and camera settings to post-processing magic. Let’s learn how to harness the power of patience and precision to freeze time and share the beauty of slow, subtle transformations through the lens of your camera.

1. Selecting the Right Equipment
Before embarking on your long-term timelapse journey, it’s essential to equip yourself with the right tools. The selection of your gear will greatly influence the quality and feasibility of your project. Here are the key components you need to consider:
1.1 Camera: Selecting the right camera is paramount. While modern smartphones can capture time-lapses, a DSLR or mirrorless camera is often preferred for their superior image quality and flexibility. A megapixel is usually a good indicator of the camera’s photo quality but surely not everything, check our guide on DSLRs to know more about the camera’s details. Ensure your camera has a reliable power source and can be easily connected to an external power supply.
1.2 Lens: Choose a lens that suits your project’s needs. Wide-angle lenses capture more of the scene, making them ideal for landscapes or large-scale construction projects. Prime lenses with wide apertures are great for low-light conditions and artistic effects.
1.3 Mounts: Stability is crucial for timelapse photography, especially for long-term projects. Invest in a dedicated camera mount to keep your camera steady throughout the entire shoot.
1.4 Remote Shutter Release: To automate your shots at predefined intervals, you’ll need an intervalometer or remote shutter release. This device allows you to set the frequency of shots and the total duration of your time-lapse.
1.5 Storage: Long-term timelapses can generate a massive amount of data. Make sure you have ample storage space, either in the form of large-capacity memory cards or external storage devices. It’s also a good practice to have backups in case of data loss.
1.6 Power Source: Since your camera will be continuously capturing images for an extended period, a reliable power source is essential. Depending on your setup, this might involve extra camera batteries, a battery grip, or an external power supply.
1.7 Weather Protection: If your timelapse project will span multiple days or seasons, consider weather protection for your gear. Rain covers and protective enclosures can safeguard your camera from the elements.
By carefully selecting the right gear for your long-term timelapse project, you’ll set a solid foundation for capturing stunning and seamless sequences of time unfolding before your lens. In the next sections, we’ll delve deeper into planning your shoot, camera settings, and post-processing techniques to help you bring your timelapse vision to life.

2. Planning Your Time-lapse
Successful long-term timelapses require meticulous planning. Without a clear vision and strategy, your project may encounter unexpected challenges or fail to achieve the desired outcome. Here are key considerations for planning your timelapse:
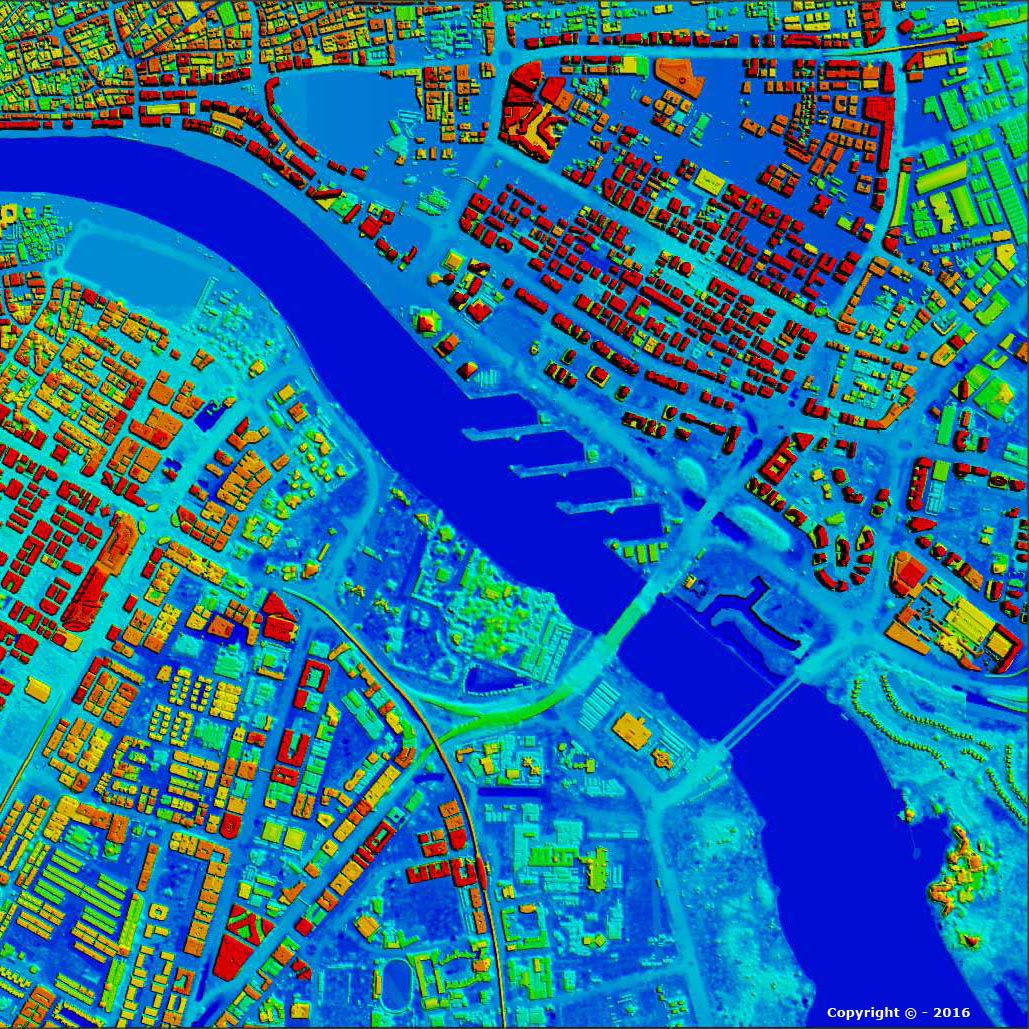
2.1 Define Your Purpose: Begin by defining the purpose of your timelapse. Are you capturing the construction of a skyscraper, an infrastructure like a road or a bridge? Understanding your project’s objective will guide your decisions throughout the process.
2.2 Location Scouting: Visit your chosen location well in advance. Identify the best vantage points and angles for your camera setup. Consider factors such as lighting conditions, the movement of subjects, and potential obstructions. Visit the location at different times to assess lighting changes throughout the day.
2.3 Timing and Duration: Determine the timing and duration of your time-lapse. How long will your project span? Will it cover hours, days, weeks, or even months? Decide the intervals at which you’ll capture images and calculate the overall duration based on your project’s objectives.
2.4 Lighting Conditions: Lighting plays a crucial role in timelapse photography. Consider the time of day and how natural light will change throughout your project. Sunrise and sunset often provide captivating lighting, but also be prepared for challenges like harsh midday sun or low-light conditions at night.
2.5 Weather Considerations: Weather can be unpredictable, especially for long-term time-lapses. Have contingency plans in case of rain, wind, or extreme weather conditions. Weather-sealed gear and protective enclosures can help safeguard your equipment.
2.6 Composition and Framing: Plan your composition carefully. Think about the framing, the movement within the frame, and how your subjects will interact with the camera over time. Composition guidelines like the rule of thirds can enhance the visual appeal of your timelapse.
2.7 Power Management: Ensure your camera’s power source can sustain the entire duration of your timelapse. Depending on your setup, you might need a combination of batteries, external power sources, or solar panels. Always carry extra power options.
2.8 Test Shots: Before committing to your long-term timelapse, conduct test shots to fine-tune your camera settings, framing, and exposure. This will help you identify and address any issues before the main shoot.
2.9 Legal and Permissions: If your project involves capturing private property or public spaces, be aware of legal and permit requirements. Obtaining the necessary permissions is essential to avoid legal complications.
2.10 Safety Measures: Prioritize safety, especially if your timelapse requires access to remote or potentially hazardous locations. Inform others about your project’s duration and location, and take necessary precautions.
By carefully planning your long-term timelapse, you’ll be better prepared to capture the passage of time seamlessly and achieve your artistic or documentary objectives. In the following sections, we’ll explore camera settings, shooting techniques, and post-processing tips to bring your timelapse project to life.

3. Camera Settings for Long-Term Timelapse
Now that you’ve planned your long-term timelapse project, it’s time to set up your camera and configure the essential settings. Proper camera setup and settings are critical for achieving high-quality timelapse sequences. Here’s what you need to consider:
3.1 Camera Selection: Choose a camera that suits your project’s requirements. While DSLRs and mirrorless cameras are popular choices for timelapse photography due to their manual controls and interchangeable lenses, high-quality compact cameras and even smartphones can also produce impressive results.
3.2 Sturdy Mounting: Invest in a sturdy mount to keep your camera stable throughout the entire shoot. Ensure the mount is fastened to a secure structure, and consider using additional mounts to prevent any unwanted movement.
3.3 Manual Mode: Set your camera to manual mode to have full control over exposure settings. Automatic modes may lead to inconsistent exposures as lighting conditions change.
3.4 Aperture, Shutter Speed, and ISO: Adjust your camera’s aperture, shutter speed, and ISO settings to achieve the desired exposure. In timelapse photography, consistency is key. Aim for a fixed aperture and maintain a balanced exposure by adjusting the shutter speed and ISO as lighting conditions change.
3.5 Focus and Depth of Field: Select the appropriate focusing method for your project. For most timelapses, manual focus is preferred to prevent the camera from refocusing between shots. Use a narrow aperture (higher f-stop) to increase the depth of field and ensure sharpness across the frame.
3.6 White Balance: Set a fixed white balance that matches the prevailing lighting conditions. Avoid auto white balance, which can lead to color shifts in your timelapse sequence.
3.7 Intervalometer or Remote Shutter Release: To capture images at regular intervals without physically touching the camera, use an intervalometer or remote shutter release. These accessories prevent camera shake and ensure precise timing.
3.8 Storage Capacity: Use high-capacity memory cards to accommodate the numerous images your timelapse will require. Ensure you have enough storage space for the entire project’s duration.
3.9 RAW vs. JPEG: Consider shooting in RAW format if your camera supports it. RAW files provide greater flexibility during post-processing, allowing you to make adjustments to exposure and color grading without compromising image quality.
3.10 Battery Management: Monitor your camera’s battery life closely. Long-term timelapses can drain batteries quickly, so have spare batteries or a reliable external power source on hand. Keep your camera and power source protected from extreme temperatures.
3.11 Mirror Lock-Up: For DSLR cameras, use the mirror lock-up function to minimize vibrations caused by the mirror movement during each shot.
3.12 Lens Care: Keep your camera lens clean and protected from dust and moisture. Consider using lens hoods and protective filters.
With your camera set up and settings configured, you’re ready to begin capturing the individual frames of your long-term time-lapse. In the next section, we’ll delve into shooting techniques and strategies to ensure a smooth and
visually compelling timelapse sequence.

4. Shooting Techniques and Strategies
As you embark on your long-term timelapse journey, employing effective shooting techniques and strategies is crucial to achieving captivating and seamless results. Here are some key considerations:
4.1 Frame Rate and Interval: Determine your desired frame rate and interval between shots. The frame rate (measured in frames per second or fps) dictates how smoothly your timelapse will play back. Common frame rates include 24fps and 30fps for cinematic results. The interval between shots depends on the duration of your project and the speed at which you want time to appear compressed.
4.2 Composition and Framing: Compose your shots carefully, considering the principles of photography like the rule of thirds, leading lines, and symmetry. Plan your framing to capture the changing elements over time, such as the movement of clouds, shifting shadows, or construction progress.
4.3 Exposure Ramp: In situations where lighting conditions change significantly over time, implement an exposure ramping technique. Gradually adjust your camera’s exposure settings as needed to maintain consistent brightness throughout the timelapse. Dedicated intervalometers often offer exposure ramping features.
4.4 Long Exposures: Experiment with long exposures, especially during low-light conditions or for capturing the smooth flow of moving lights. Use neutral density filters to reduce incoming light and achieve longer shutter speeds.
4.5 Monitoring and Review: Regularly review your captured frames to ensure they meet your expectations. Use the camera’s LCD screen or a tethered laptop for a larger preview. Adjust settings if necessary to maintain image quality.
4.6 Weather and Lighting: Be patient and adaptable when dealing with weather and lighting conditions. Sometimes, the most dramatic timelapse sequences come from waiting for the perfect moment when natural light or weather conditions align.
4.7 Safety and Security: If your long-term timelapse is set up in a public or remote location, consider safety and security measures for your equipment. Ensure it’s protected from theft, vandalism, or adverse weather.
4.8 Post-Processing: Prepare for post-processing by shooting in RAW format and maintaining consistent color grading throughout your sequence. Organize your files efficiently for smoother editing.
4.9 Backup and Redundancy: Implement a robust backup strategy to safeguard your footage. Consider automatically backing up files to an external drive or cloud storage as you shoot. Redundancy is essential for long-term projects.
4.10 Editing and Export: After capturing all your frames, import them into video editing software like Adobe Premiere Pro or Final Cut Pro. Edit your timelapse, add music or narration if desired, and export it in your preferred video format and resolution.
4.11 Patience and Perseverance: Long-term timelapse projects can span weeks, months, or even years. Patience and perseverance are your allies. Stay committed to your vision and monitor the progress of your timelapse regularly.
With these shooting techniques and strategies in mind, you’re well-prepared to embark on your long-term timelapse project. The next section will explore post-processing and editing, where you’ll transform your captured frames into a captivating timelapse video.
5. Post-Processing and Editing
Once you’ve captured all the frames for your long-term timelapse, it’s time to transform them into a polished and captivating video. Post-processing and editing play a crucial role in enhancing the visual appeal and storytelling of your timelapse. Here’s how to bring your project to life in the editing room:
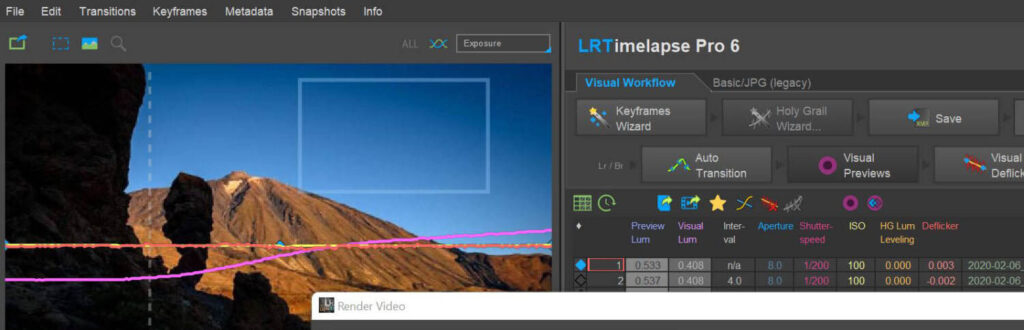
5.1 Import and Organize: Begin by importing all your captured frames into video editing software such as Adobe Premiere Pro, Final Cut Pro, or a dedicated timelapse editing tool like LRTimelapse. Organize your files into a clear folder structure to streamline the editing process.
5.2 Frame Rate and Resolution: Set the desired frame rate for your timelapse video. Common choices include 24fps and 30fps for cinematic results. Ensure your project settings match the frame rate and resolution of your captured frames.
5.3 Sequence Creation: Create a new sequence in your editing software and drag your organized frames onto the timeline. Adjust the sequence settings to match your frame rate and resolution if they don’t match automatically.
5.4 Deflickering: During long-term timelapse capture, variations in lighting can result in flickering in your footage. Use deflickering software or plugins to smooth out these variations for a consistent look.
5.5 Color Grading: Enhance the visual impact of your timelapse by applying color grading. Adjust the colors, contrast, and saturation to achieve the desired mood and style. Consistency in color grading across all frames is essential for a seamless look.
5.6 Adding Music and Audio: Consider adding music or ambient audio to complement your timelapse. Choose music that matches the mood and pace of your video. Ensure the audio doesn’t overpower the visuals.
5.7 Speed Control: Adjust the speed of your timelapse by changing the duration of each frame. Experiment with different playback speeds to achieve the desired effect. Slow motion or fast motion can add a unique dimension to your timelapse storytelling.
5.8 Transitions and Effects: Use transitions and effects to create smooth transitions between scenes or add creative elements to your timelapse. Common transitions include crossfades and dissolves. Effects like zooms or pans can add visual interest.
5.9 Titles and Captions: If your timelapse tells a specific story, consider adding titles or captions to provide context or narration. Ensure that text is legible and doesn’t distract from the visuals.
5.10 Review and Fine-Tuning: Watch your edited timelapse multiple times, paying attention to pacing and flow. Make necessary adjustments to timing, color, or effects to achieve a polished result.
5.11 Exporting the Final Video: Once you’re satisfied with your timelapse, export it in your preferred video format and resolution. Consider rendering it in high-definition (HD) or even 4K for maximum visual quality.
5.12 Archiving and Backup: After completing your timelapse video, archive all project files, including the original captured frames, edited sequences, and project settings. Maintain backups of your work to safeguard it for future reference or revisions.
5.13 Sharing Your Timelapse: Share your long-term timelapse with the world. Upload it to video-sharing platforms like YouTube or Vimeo, and promote it on your website or social media channels. Engage with your audience and gather feedback to improve your future projects.
With post-processing and editing, you can elevate your long-term timelapse from a collection of frames to a visually stunning and captivating storytelling experience. Take your time in this phase to ensure your vision comes to life as intended.
Transforming Time with CONSAI Long-Term Timelapse Solutions
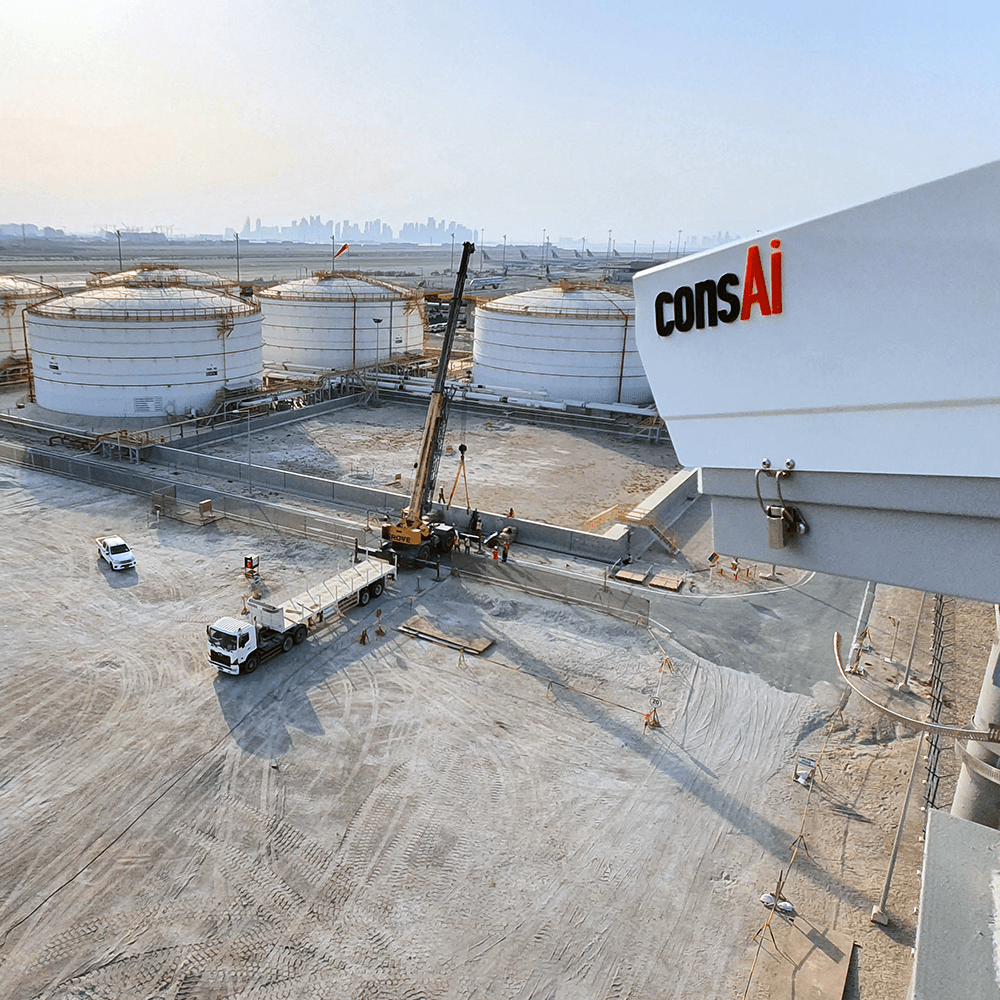
In the world of long-term timelapse for construction projects, CONSAI offers you a front-row seat to the captivating show of gradual change and transformation. Our specialized long-term timelapse production services, powered by cutting-edge camera systems, are designed to not only save you time and money but also provide you with a hassle-free, comprehensive solution for your projects.
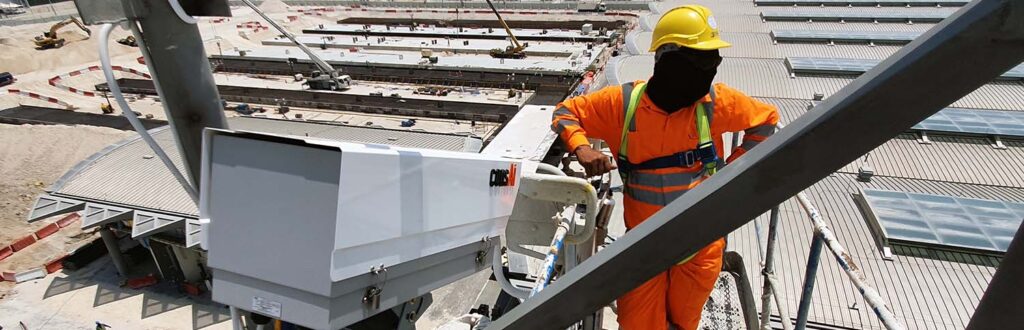
At the core of successful long-term timelapse is meticulous planning, and with CONSAI, you can leave no detail to chance. Our Hitech camera systems are engineered for efficiency and flexibility, equipped with data management for your photos, power management to ensure uninterrupted operation and robust backup mechanisms for added security.
But that’s not all—our proprietary software takes the convenience a step further. It empowers you to keep a watchful eye on your camera pictures and effortlessly manage your entire timelapse project remotely. With just a few clicks, you can monitor progress, and ensure your vision comes to life exactly as envisioned.
In the world of long-term timelapse, where every moment counts, CONSAI offers not just equipment but a seamless, end-to-end solution. It’s time to embrace the future of timelapse photography and let CONSAI’s expertise and technology transform your vision into a captivating reality. Say goodbye to the complexities of time-lapse projects and hello to the effortless beauty of change, all with CONSAI by your side.